
How to Build a Salt Room: Complete Guide to Bricks and Tiles
TL;DR
To build a salt room, plan moisture, wall support, lighting and material quantity before you fix any salt. Choose bricks for deep, solid walls or tiles for slimmer panels, and keep lighting accessible.
Introduction
If you want to build a salt room, salt bricks are only the start. A good result also needs a dry room, strong wall support, planned lighting and accurate material counts. You’ll also need a plan for future maintenance.
This guide shows how to build your own salt room, step by step. It also explains when to choose pink salt bricks and when Himalayan pink salt tiles work better. It’s written for home owners, contractors and spa owners.

Before You Build a Salt Room: Decorative or Active?
First, decide what kind of salt room you want. Most projects fall into two groups.
- Decorative salt room: Salt walls, warm lighting and comfortable seating. The goal is a calm, natural look.
- Active halotherapy room: Decor plus special equipment that disperses dry salt particles into the air.
A decorative Himalayan salt room does not automatically become an active halotherapy room. Salt bricks and tiles mainly form the room’s architectural and visual surfaces. This guide focuses on building those surfaces.
Salt Bricks vs. Salt Tiles: Which Should You Use?
This choice shapes your whole build. Himalayan bricks give a thick, solid wall. Himalayan pink salt tiles give a slimmer finish with less weight. Both come from natural rock salt, so each piece varies in color.
| Factor | Salt Bricks | Salt Tiles |
| Thickness | Thicker | Thinner |
| Look | Deeper, salt wall appearance | Slimmer wall finish |
| Weight | Heavier | Lighter |
| Best Use | Full feature walls | Decorative panels and backlit lighting |
| Wall Depth Needed | More | Less |
| Lighting | Strong, textured glow | Good for slim illuminated panels |
Choose bricks when you want a bold, full-height feature wall.
Choose tiles when depth or weight is limited.
Also, a single brick of salt is heavy, so tile walls are easier on older structures. StarlineSalt makes both and can cut custom dimensions for architectural projects.

Step 1: Measure the Room and Calculate Materials
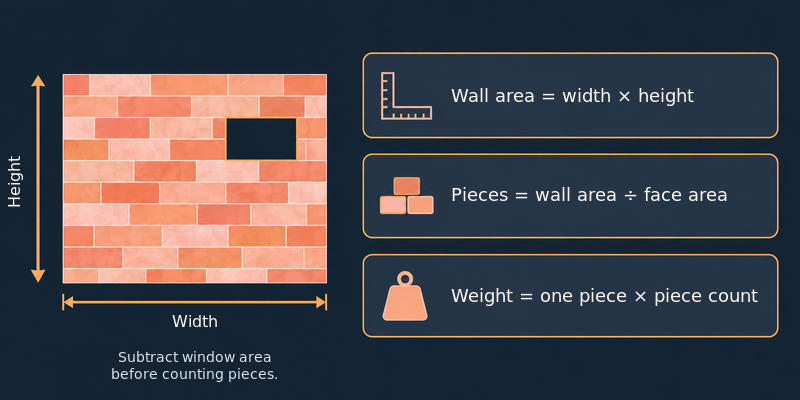
Start with the wall area. Multiply width by height. Then subtract doors and windows.
Next, find the face area of one brick or tile. Divide the wall area by that number. The result is your approximate piece count.
Example: A wall is 10 ft wide and 8 ft high. That’s 80 sq ft. Subtract a 3 × 2 ft window, which leaves 74 sq ft. An 8 × 4 in brick face covers about 0.22 sq ft. So you need about 333 bricks.
Then add spare pieces for cuts and breakage. Natural salt varies, and later batches may not match your wall. So order matching spares now. Finally, multiply one piece’s weight by your piece count to get total weight.
Ordering for a big project? Ask about salt bricks wholesale or Himalayan salt tiles wholesale options.
Step 2: Check the Room for Moisture
Salt and moisture don’t mix well. Salt absorbs water from damp air. In a wet room, it can turn dull, sticky or stained. So check the room before you build.
- Repair any leaks first.
- Look for condensation on walls and windows.
- Let fresh plaster or concrete dry fully.
- Make sure the room has normal ventilation.
- Keep salt away from splash areas.
After installation, watch for any unusual damp spots.
Step 3: Build a Strong Frame and Backing
A salt wall is heavy. So plan the support before you buy anything. Weigh one brick of salt, then multiply by your piece count.
Don’t forget the wall weight
- Bricks can add a large total load.
- The base and frame must suit that load.
- Adhesive should not be expected to carry a heavy wall by itself.
- Large walls need a check by a building professional.
Next, fit a stable base and a rigid backing board. Then add a frame that suits your wall size. Tiles are lighter, but they still need solid backing.
Step 4: Plan the LED Lighting Before Installing Salt
Light changes how salt looks. So plan it before any brick goes up. Warm LEDs usually look best on pink salt. They bring out peach, orange and rose tones.
Follow these tips:
- Leave an air gap between the LEDs and the salt.
- Test several bricks with the lights first.
- Adjust the spacing to avoid bright spots.
- Keep drivers and wiring easy to reach.
- Include a service panel.
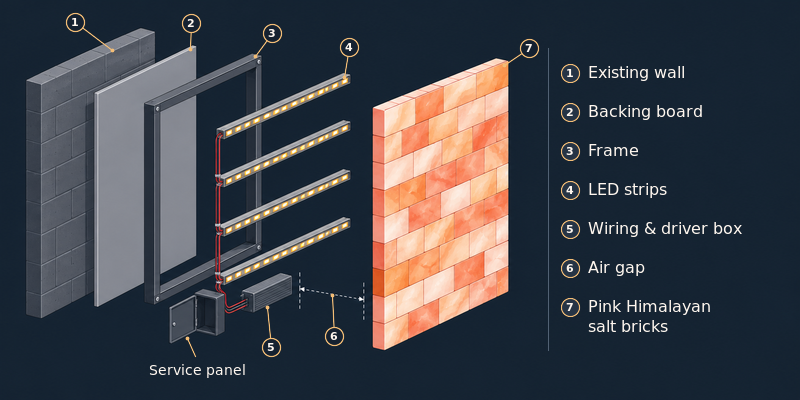
What Goes Behind a Backlit Salt Wall?
From back to front, the layers are:
- Existing wall
- Backing board
- Frame
- LED lighting
- Wiring and drivers
- Air space
- Salt bricks or tiles
Never seal drivers or connectors behind the salt. If an LED fails, a service panel lets you replace it without taking the wall apart.
Step 5: Lay Out and Install the Bricks or Tiles
Now you can start the install. Follow this order:
- Keep all salt dry until you fix it.
- Lay pieces out on the floor before fixing them.
- Mix natural colors so light and dark pieces spread evenly.
- Plan your cuts before you start.
- Use the fixing system your supplier or installer approves.
- Check alignment as you go.
- Keep spare pieces for later.
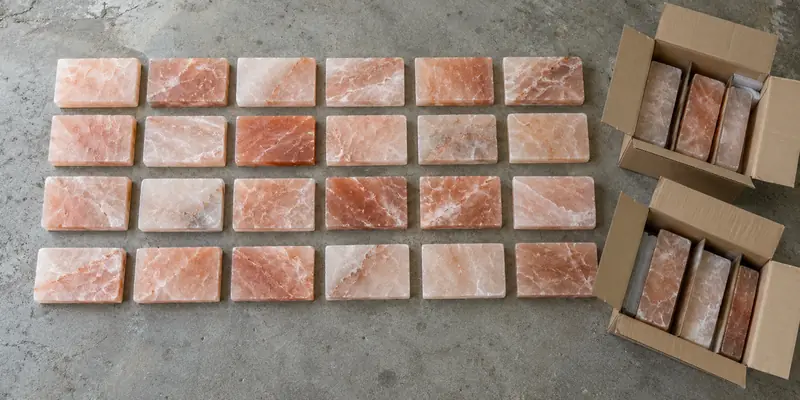
Natural salt varies in pink, peach, orange, red and translucency. So a dry layout matters. It stops dark or pale patches from clumping together.
From the StarlineSalt Product Team
Natural salt bricks won’t all have the same shade or translucency. For larger walls, lay out several cartons first. Then spread lighter and darker pieces across the design.
5 Salt Room Construction Mistakes to Avoid
Most problems start before the first brick goes up. Watch out for these five.
- Ordering before measuring. Wrong counts waste time and money.
- Ignoring wall weight. A heavy wall needs a suitable base and frame.
- Skipping the LED test. Without a test, you may get harsh bright spots.
- Sealing wiring away. Hidden drivers are hard to repair.
- Building in a damp room. Moisture can dull and stain salt.
How Do You Maintain a Salt Room?
A salt room needs very little care. However, a few habits help it last.
- Dust with a dry cloth. Avoid water and sprays.
- Check the room for moisture now and then.
- Look for loose pieces.
- Inspect the lighting.
- Keep the wiring access panel clear.
- Replace any damaged piece with a spare.
Conclusion
A well-built salt room starts with accurate measurements and the right choice between bricks and tiles. It also needs strong support, a dry space and planned lighting. Build for maintenance as well as looks, especially when electrical parts sit behind the wall.
Ready to start? Browse our Himalayan salt bricks and tiles, or contact the StarlineSalt team for custom sizes and samples.